Mastering the perfect winged eyeliner can be a game-changer for your makeup routine. It enhances your eyes, adds definition, and gives a polished, elegant look that suits both casual days and special occasions. However, achieving that sharp, flawless wing can be tricky, especially if you’re new to makeup or don’t have much practice with liquid or gel liners.
If you’ve ever struggled with uneven wings or shaky lines, don’t worry — with the right techniques and a little patience, you can learn how to create a stunning winged eyeliner look that stays put all day.
When it comes to nailing the perfect wing, having a quality eyeliner is essential. Whether you prefer liquid, gel, or pencil, choosing the right product for your style and comfort is the first step towards success. Many find that liquid liners offer precision, while gel liners give a smooth, bold finish.
Step-by-Step Guide to Perfect Winged Eyeliner
- Prep Your Eyelids
Start by ensuring your eyelids are clean and free of oil. You can apply a light primer or a dab of translucent powder to create a smooth base. This step helps the eyeliner stay put and prevents smudging throughout the day. - Choose Your Tools
Select an eyeliner that suits your skill level and desired look. For beginners, pencil eyeliners can be easier to control. As you gain confidence, experiment with liquid or gel liners from your makeup kits to achieve sharper wings. - Start With a Guideline
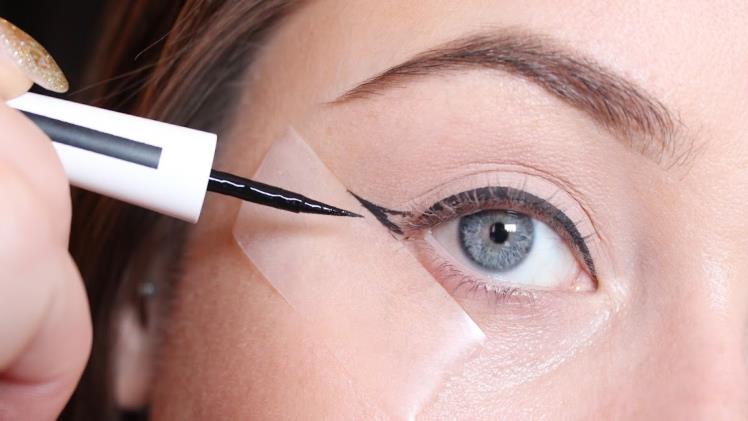
Use a small brush or the tip of the eyeliner to create a tiny dot or dash where you want the wing to end. A helpful trick is to follow the natural angle of your lower lash line extending towards the tail of your eyebrow. - Draw the Wing First
Begin by drawing a thin line from the outer corner of your eye toward the dot or dash you placed earlier. This forms the wing’s foundation. - Connect to the Lash Line
Next, draw a line from the tip of the wing back towards your upper lash line, creating a triangle shape. Fill in this triangle carefully for an even finish. - Line the Upper Lash Line
Now, draw a line along your upper lashes, connecting it smoothly with the wing. For a more dramatic effect, you can thicken this line. - Perfect the Edges
Use a cotton bud dipped in makeup remover to clean up any mistakes or sharpen the wing’s edge. This helps achieve a crisp, defined look.
Handy Eyeliner Hacks
- Tape Trick: Place a small piece of tape angled from the outer corner of your eye towards the end of your eyebrow before applying eyeliner. This acts as a guide for a clean wing and protects the skin from excess product.
- Use a Spoon: The curved edge of a spoon can help steady your hand and create even wings on both eyes.
- Layering: Start with a thin line and gradually build thickness. This prevents overdoing the eyeliner and makes corrections easier.
- Set Your Eyeliner: To avoid smudging, lightly dust translucent powder over the liner or set it with a matching eyeshadow from your makeup kits.
Why Winged Eyeliner Works
Winged eyeliner enhances the eyes by elongating their shape, giving a lifted, youthful effect. It suits almost every eye shape and adds instant sophistication to your makeup look. Once you master this technique, it becomes an effortless step that elevates your overall appearance.
Final Thoughts
Creating the perfect winged eyeliner may take practice, but with the right tools and a few helpful hacks, it’s achievable for everyone. Remember to choose an eyeliner that feels comfortable for you and start slow — precision improves with patience.
Incorporate these tips into your makeup routine, and soon, winged eyeliner will become your go-to look for any occasion. Whether you’re dressing up for a party or just want to enhance your everyday style, mastering this classic technique adds a beautiful finishing touch.